|
|

|
Adding - Navigation or Deck & Spot Lights - is easy to do on model boats & ships when you know how to do the wiring. Lights add realism by providing the model with a look, as if its really a working vessel - operating at night. And since we're not talking about something that involves wiring 110 or 220 Volts Ac. This isn't to hard to figure out, since your only working with small voltages - usually between 6 & 12 Volts DC! ____________________________________________________________________________
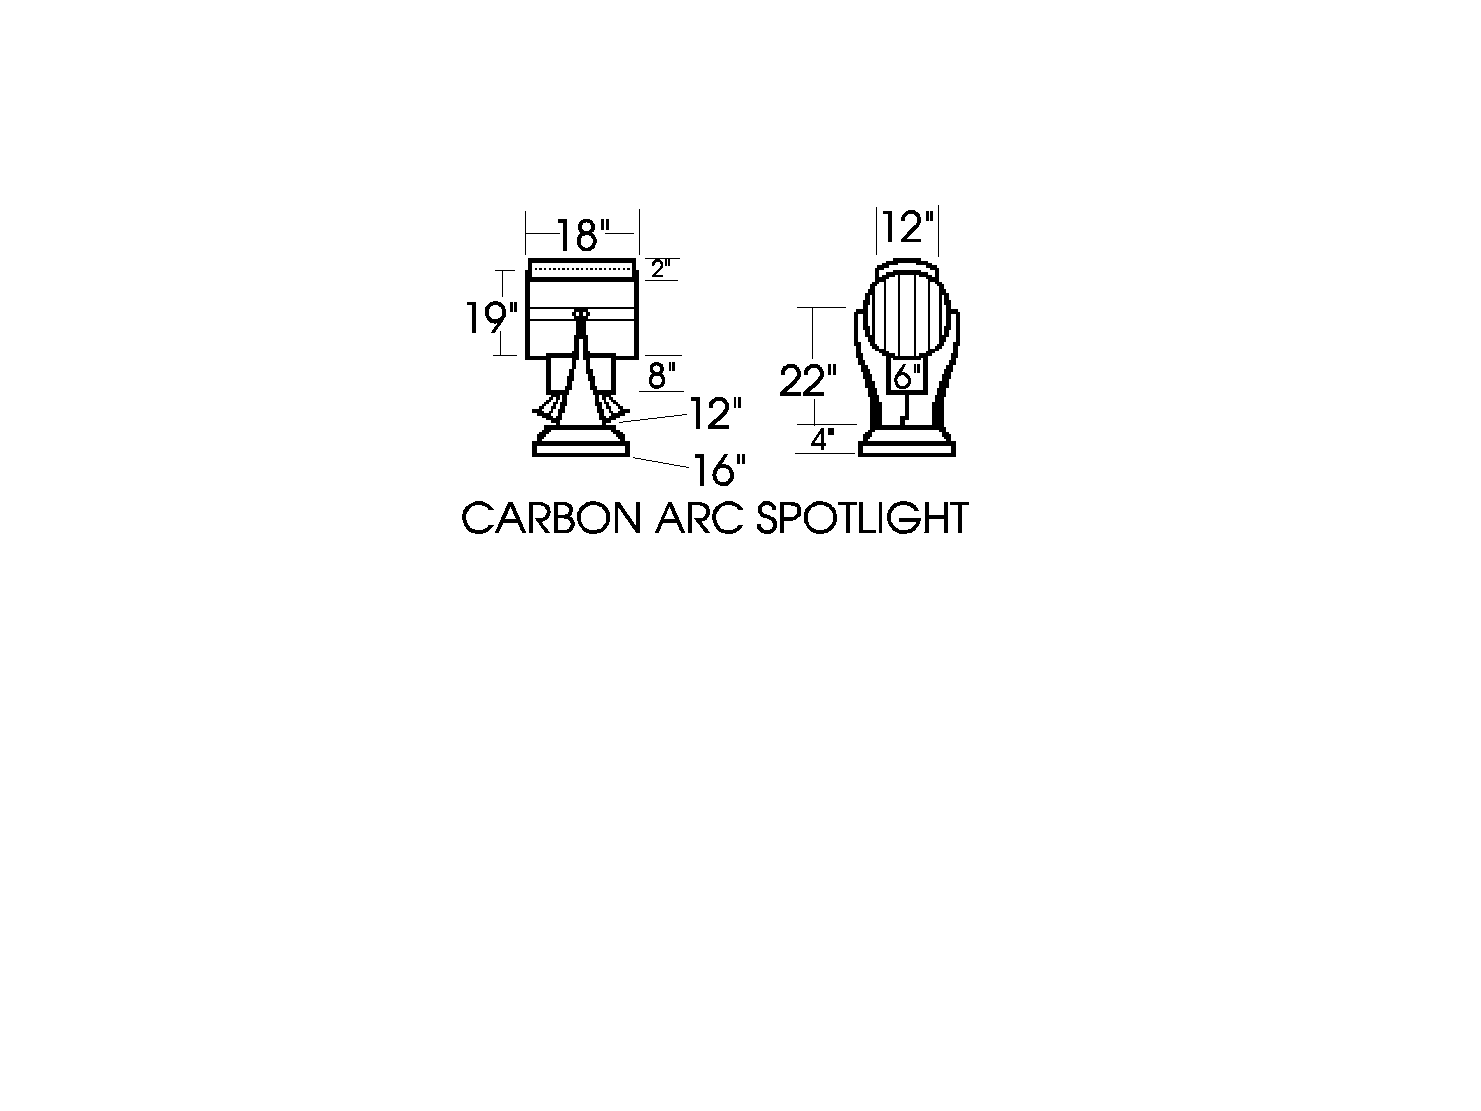
Types of Lights Used On Vessels Naturally, it depends upon what type of vessel - your modeling, but as a rule, any type of vessel will have the following typical types of navigational or general types of marker - lights. Interior Lights = Fixtures will include - Ceiling, Table lamps and/or Instrument Gauges - Etc., used at night to see clearly, inside the vessel. Noting the helm, is usually kept totally - dark, to reduce glare and reflections, so the pilot can see other traffic. But modelers may occasionally want to add a ceiling light - inside the helm of a model boat. Activated by a switch that's either operated - by hand, or by the r/c radio, illuminating the helms - interior, to show its details! Deck Lights = typical deck lamps ( covered by protective - Metal & Glass Safety Frames ), providing the crew a clearer view for working or walking on vessel - Decks. Would also include - brighter versions of "HEAD DECK" - Flood Lights. Color of bulbs - used, usually Yellow or White - incandescent types! Side - Flood Lights = Used on many Tugs & Towboats .... Are located Forward & Stern and usually mounted on the helm Roof, or just below the helm on a lower deck. These flood lights allow a better side view for pilots, when locating objects the vessel is running or maneuvering closely too. With the Stern - Flood Lights .... pointed - slightly aft on either side of the stern, in direction. Giving the pilot a better view, of what is behind or close to the boat. Navigation Lights .... Red = PORT, Green = STARBOARD & Orange, Yellow & White = Stern & Bow - towing lamps. There are also Amber Nav-lights, which indicate the same things, or when placed in certain areas on vessels or barges - can mean something else. Lights are used as "Day & Night" visual notifications to all other vessels and traffic, that a vessel is either - underway, towing something, or - Not, or its not - Moving, as a danger to channel traffic, and at anchor. And can also cover navigation indications that tell other traffic, if the boat is Loading or Unloading Cargo, such as dangerous materials = Gasoline, fuel oils - Etc. Spot Lights = High Powered - Carbon Ark & Incandescent Light systems - on the Helm Roof, are also found sometimes on the stern deck - as well. When mounted on the stern, their remote operated by the pilot, whom wants a better view of things - close to the stern of the boat. Also found in numbers of as many as 3 - Spot Lights, mounted on the Helm Roof. Which the 3rd spotlight, is used in whatever manner the pilot wants or needs. Often used when setting up the tow, or when switching tows, or shifting barges in a fleet. Navigation Lights Their Positions" on Vessels! Go to this
Coast Guards Website at
____________________________________________________________________________
Navigation Lights - On Barges! Tap Drawing to Enlarge It
Note the - Blue Navigation Light - Atop the "Banner Flag Pole" .... Is the Pilots = Gun Site, used to aim the barge tow = at night. Its marks the leading center - line of the tow and shows the pilot where the barges - Are, at all times. Always a very bright blue - light, that is so tiny = in scale, its almost impossible to model - In Scale. However in a larger scales above 1/4 inch equals = 1 foot, it could indicated by using a mini - LED or tiny - "Grain of Sand" or Grain of Rice - size light bulb. Today's - Nav Lights, on barges and tows are most always powered by - rechargeable battery packs, so you can simply drill holes in the barges - deck, to mount them so they look like rechargeable - power pack systems. Or if you wish, run - tiny wires to the lights, like they are older types, powered by 110 volts ac, used a few years back, as some still do - today. ____________________________________________________________________________ Spot Lights = THAT WORK! Tap Drawings to Enlarge
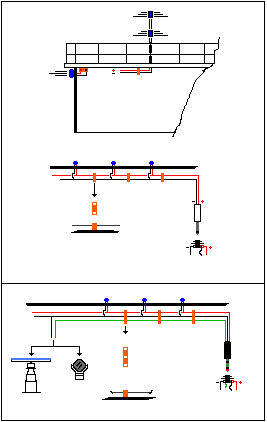
____________________________________________________________________________ Deck & Flood Lights = That WORK! Deck Lights Are Also Called "Guard Lights" ... used to illuminate the "Decks & Stairways" on vessels, these lights are most often mounted along the sides of bulkheads, inside a protective glass covered bulb shield to avoid sparks setting off - a fire, if the bulb - breaks. Here, in 1/48 scale models, miniature - LED's, can be used, or 6 to 12 volt light bulbs of similar size, available in many colors ( Amber or White ), to mimic these lamps that run along decks or have been installed over stairways & ladders. SPECIAL NOTE ..... Here also, we should discuss the SIDE - FLOOD Lights on vessels, which are brighter than ordinary deck lights, used by pilots to see what is beside or just off the stern of the vessel. Side Flood lights on the stern, are mounted so they shine slightly - aft of the vessel, while the forward sets, usually mounted just below the Helm, on a lower decks - structure sides, are mounted, so they shine - slightly forward. And there are also Deck - Flood Lights, used to illuminate the "Head Deck" or work areas on a vessels - Bow & Stern. These systems - Side Floods & Deck Floods, look like small Fog Lights, used on autos & trucks, and can be square shaped or rounded versions in their mountings. Not to be confused with small "Spot Lights"...which these systems are not as bright, and can't be focused on a single point. Tap Drawing to Enlarge
The Bottom Drawing, shows a slightly more sophisticated system that has "Three Wires" = Red - Green & Black. Allowing two different light systems to be switched on/off = independent of the other, or it would allow the use of different voltages to power certain lights, or LED'S - if you wish. Here, you might be able to use a common 3-pin type of "Stereo Headphone Jack & Plug" - for example, to allow the structure to plug into the socket, mounted inside the models Hull. Wired to the battery with a single ground wire, split between the Red & Green Wires - to provide both systems - A single Ground, yet allowing two voltages to be used on switches. Here, the use of a "Voltage Regulator Circuit applied one side of this 3-wire system, would be able to provide vertually any voltage needed. While the other side - powers a 12 volt motor to a Radar = that turns, or maybe works - a set of Spotlights, that may require a higher voltage. Effectively the second wiring diagram, could also be expanded further ( by use more than 3- wires ), to work any number of model functions or lights & effects, with several wires used as Grounds to each circuit, being a common practice. The use of wooden insulators, is optional, since plastic works - just as well in this case. Just drill extra holes to match the wiring requirements you need in the Insulators for your models - lights and effects. Protected - by fuses, to avoid electrical - shorts o Of Course! NOTES ..... I've used - this idea, to "Back Light" - A HELM CONSOLE, so its gauges lit up and it works great. It would also work, using a multiple wire arrangement, supplying the voltage - to lights, inside or on the rood - of the Helm Too. Simply by hiding the wires behind helm - wall paneling, or under a false - ceiling, or running wires - inside tubing ( pipes ), from the floor to the ceiling, for example! I'll Add More - Later, so check back Often! _______________________________________________________________
Last Updated
On 06/29/23 .
With
|

 TM
TM