|
|

|
Making "Homemade" Tools for your hobby workshop - Ain't Hard! Whether its a simple sanding block, or something a bit more complicated. You may already have most of what's required to make the item, amid your scrap parts - maybe. for example. If not, check out - Flea Markets, Electronics' Parts Suppliers and local - Auctions & Sales, for reduced priced - used tools and old parts and items, or even Craft Stores = for example. You'd be surprised what you'll find for pennies on the dollar, that can be converted or abused & heavily used - battery powered - toys. ________________________________________________________________________________
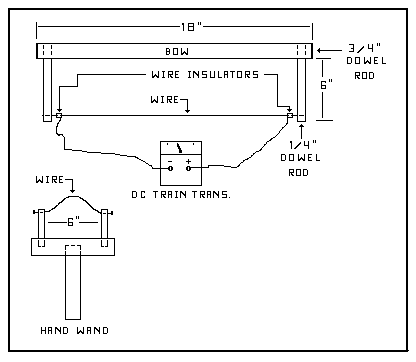
The Hot Wire - Foam Cutter Tap Drawing To Enlarge
HOT WIRE .... Parts List - #1 ... Ac or Dc - Model Train Transformer ( 12 to 18 volts output at 2 - 4 Amps. ) Most any train transformer will do, including similar Power Transformers with variable Ac or Dc - outputs. Purchased or Scrapped from your parts, that meet required Voltage & Amps. #2 ... Dowel Wood - Rods = ( Handle & Bow ) making parts of 1/4" & 3/4" Dia.. Rods NOTE ... Make the Bow and Hand Wand to the widths you require, to cut any size foam. Usually a ni-chrome wire stretched between the bow - ends, that's 2 1/2 feet wide - at most. Works fine for most any job you'll use this system for. As for the Hand Wand, it should be a U-shaped - short piece of nichrome wire, about 4 inches in length = between the forks of the wand. Then before use, shape the wire to desired shapes for carving jobs, then turn the power - On and gently start carving. #3 ... Nichrome Wire Sources = Hobby Shops or Hobby Suppliers = A resistor wire that heats up, to cut or melt Styrofoam. #4 ... Two Scrap pieces of Brass Tubing, used to make - heat insulators to avoid the wood dowel rods from being burned by the nichrome wire. INSTRUCTIONS FOR USE ....... Set your Transformers - voltage settings, at the lowest voltage setting - First. Then turn the system - On. Slowly increase the voltage until the "Nichrome Wire" starts to smoke and heat up. Testing the heat settings on a piece of scrap foam - First, before you start cutting anything, adjusting the voltage setting accordingly. WARNING .... Never set the voltage higher than is needed to cut your foam, Slow & Smoothly. The wire can be easily - Burn Out and will break apart and easily injure you or someone else! ________________________________________________________________________________
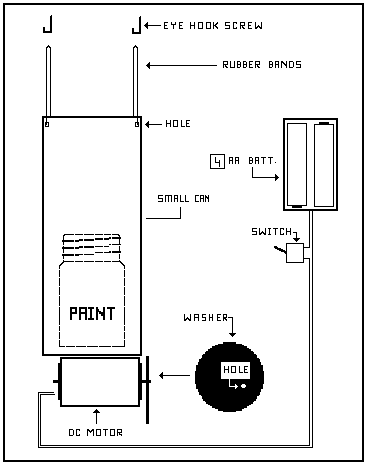
Homemade "Paint Bottle - Shaker! Powered by 9 volt or AA = Battery Pack, or Small DC Power Supply Tap Drawing To Enlarge
The Battery needs - a long very flexible wire to allow it to be mounted elsewhere on the table, so make the wires length - doesn;t effect the shaker or stiffen its motions. So make the wires as long as you need, to be lounted elsewhere on your bench. And the "Washer", is attached to the motors - drive shaft, so it wobbles ( drill an Offset Hole into it ), so it shakes the whole thing..... "The more it wobbles, the better it shakes the Paint!" Use CA - Super Glue, to mount the motor = to the bottom of the can, or make a metal strap to clamp the motor to the can, if you wish, but its gotta be =TIGHT! And you'll need a couple of small ( 4 ) "Wood Eye Screws" to mount the can and battery on your workbench. And then just hang the cans = two rubber bands, on two of the eye screws and the battery and wire on the othere, so the can hangs loose - by itself. Then add the bottles of paint - to be mixed and throw the switch and watcher - Sh-Sh-Sh-A-a-a-a-k! Paint Shaker - Parts List #1 ... (4) AA Batteries, or a 9 Volt Battery, or use a Junked Out = Small DC - Power Supply = 6 to 12 volt output. And wire the power supply into the switch, in place of the battery system! #2 ... AA Battery Pack = ( Radio Shack ) plastic Pack - made to hold 4 - AA Batteries. #3 ... Mini On/Off - Toggle Switch. #4 ... ( 3 feet ) of small insulated - Twin Lead - stranded = Speaker Wire. #5 ... Small 12 Volt DC Motor. ( Radio Shack ) #6 ... ( 1 ) Old FLAT - WASHER, to make the Vibrator. Drill an Off-set Hole in the washer = Way Off Center, but the same diameter as the motors - drive shaft diameter is. Then use a couple of drops of CA Glue to mountit on the shaft of the motor - firmly Just make sure the washer spins freely and doesn't bump the can as it spins around on the motor's drive shaft. That will insure a good vibration effect is provided to the can and the paints inside it, as their mixed or remixed. #7 ... ( 1 ) Tin Can ( Small - But Long Enough ) to fit two bottles of paint - inside the can = One On Top of the Other. ( NOTE ... I used an old Hair Spray Can - for mine! ) #8 ... ( 2 ) Heavy Duty - Rubber Bands. Used to mount the shaker on your workbench #9 ... ( 4 ) Wood Eye Screws - Small ones, to screw into the bench, to hang the paint shaker - On. Plus the Battery Pack too, in a nearby location. ________________________________________________________________________________
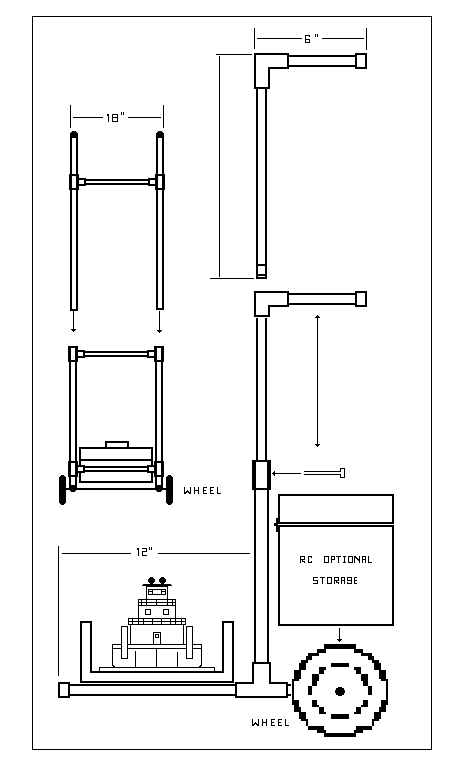
Build A Model - Transport & Launcher This idea, is mainly for "Older & Disabled" Modelers - like myself, needing assistance in getting models from the vehicle to the pond and then = launched. And this idea builds - fairly easy, and works great for anyone that needs to save their backs, from a lot of aches & pains! NOTE .... A common Two Wheel - Cargo Dolly, may be a bit heavy, but can work also, if provide a couple of helpful additions. Like for example, a wooden platform to widen its base to fit the models - hauled on it. Straps of added arms, to support or hang the tool box - similar the drawings shown below - shows as an example. Remember, you have a radio ( 's ), plus tools and support equipment to carry too, besides the boat & barges! Tap Drawing To Enlarge
Note the "Handle Bars" are adjustable in height, and also how their mounted ( IN Either Direction ) on top of the two vertical back supports of the launcher. They can be positioned either way, to assist in balancing a model, when its being launched into the water or just hauled on the transport/launcher. Just remember to remove your - Tool Box, prior to launching the model, unless ya like Soggy Tools! Parts List - #1 ... Several lengths of 1" - 1 1/2" to 2" Diameter - PVC Pipe ( Requires 2 Sizes of pipe - One Fitting into The Other - for the adjustable - handles ), plus Elbows, T's and End Caps. #2 ... 30" Length of "Threaded Rod" for the Axle, plus ( 6 ) Nuts and ( 6 ) Washers for wheel spacers #3 ... ( 2 ) Old Lawn Mower - Wheels ...... Option = "Small Air Inflated Tires" to soften bumps! #4 ... Several Large - Cotter Pins, plus a short length of Rope, to tie the Cotter Pins - to the frame to avoid loosing them, when launching boats. #5 ... Short Piece of Carpet ... Glue around frame area of Legs on the Launcher. Avoids damage to models, as their launched, transported and retrieved. #6 ... ADDED OPTION = Tool Box, a small plastic tool box to hold r/c radios, batteries, parts and tools. ________________________________________________________________________________
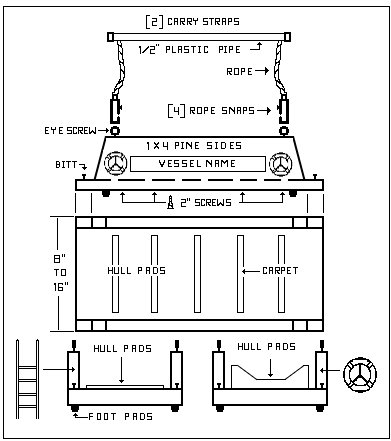
Building A Dry-dock Display / Carrier Designed to work with the above - Transport / Launcher Tap Drawing To Enlarge
I'll Add More - Later, so check back Often! ________________________________________________________________________________
Last Updated On
06/29/23 .
With
|
 TM
TM